I am currently working on a few amplifiers for a friend to clean out my work shop before I begin working on my own projects.
In the course of researching one of the amplifiers (trying to find schematics or any other repair notes that might be helpful), I came across a forum thread which really frustrated me. I try and remember that forums are largely unmoderated and that everybody is entitled to their opinion. I found this post a bit difficult to swallow.
A major boutique manufacturer of pedals and amps suggested that a good tech shouldn't need a schematic to repair an amplifier.
General misinformation on the web...What makes me different? Nothing. Take everything with a grain of salt. Do your research and make your own conclusions.
Friday, July 27, 2012
Sometimes NOTHING is what's wrong!
Been working on a friend's VHT Two/Fifty/Two amplifier.
The amplifier had been blowing the HT fuses immediately upon power up. This occurred with or without the tubes in the amplifier.
I was honestly kind of puzzled by the entire thing. Both channels had the exact same symptoms. While one channel might have had a set of filter caps go, I refused to believe that both channels had them go at the same time.
I decided to email the VHT/Fryette and try and get some help.
They were very friendly and explained that the fuses in the amplifier are purposely rated conservatively. Most people do not experience a problem but some people with abnormal power conditions may.
They suggested replacing the .5 Amp fast blow fuses with .75 Amp fuses.
Success!
So, I replaced the tubes and reassembled the amplifier.
The moral of the story is that sometimes there is nothing wrong. Had I not contacted the company, I'd still be dickering about with the amplifier and never any closer to finding out the real problem.
Shooting update
I went shooting a couple of weeks ago. The trip was cut short when the pin that holds my Ruger Mark III Competition Target model sight together started to work its way out of the sight. It is generally held in place by the friction of the sight assembly.
This is the same gun that previously had a pin work itself out of the mainspring assembly which prevented the gun from being disassembled and required it to go back to Ruger for a replacement grip frame.
I decided not to take any chances and stakes not only the pin for the sight in place, but also the pins that are in the mainspring housing on both my Competition Target model and my Hunter model.
The Hunter model has given me absolutely no issue (with the exception of the Loaded Chamber Indicator getting clogged up and causing jams - removal of this part has since solved the problem for thousands of rounds without a single malfunction).
The real test however will be shooting the gun for a few hundred rounds and seeing that everything doesn't go flying apart.
I have read posts from people in the past which talk about how some people never take apart their Ruger Mark III pistols or even some other guns and just spray cleaner inside of them and blow them out with compressed air.
I think it is really important to take apart any firearm that is in regular use and inspect for any worn or damaged parts.
While at the shooting range, I also spotted a new (well new to me) Ruger 10/22 Takedown model. I used to have one of those Henry AR-7 survival rifles and while the concept was really solid, I felt like the rifle was made to be cheap.
Henry is a great company! Don't get me wrong. They stand by their product and I have had excellent customer service interaction with them, but I just didn't like how cheap that rifle felt.
The 10/22 TD (as it will be henceforth referred) on the other hand looked like a real rifle and the best part is, it is compatible with a multitude of aftermarket parts for the normal 10/22. Additionally, it accepts 25 round magazines!
I may have to look into getting one in the future, but I think I might have to thin the heard of Marlin .22 rifles I have first.
I also went to a gun show at the beginning of the month. I picked up some cleaning patches and a plastic magazine for my Ruger Gunsite Scout rifle. I'm starting to feel like a Ruger salesman. At about half the price of the normal steel magazine, I felt it was a good deal. I can't justify 70$ on a magazine! Even 30$ seems a bit much.
I also looked at Ruger's 1911. It looked nice and felt like it had some real heft to it, but I don't need another 1911.
Ruger sent me a survey which I have yet to complete. It asked for gun suggestions. Here are 2:
9mm Revolver - I know the idea is not new, but nobody (at least to my knowledge) is currently making an affordable and quality variant of this. It'd be nice if it had a medium or large frame. I am tired of all of these small frame revolvers. Sure they have their place in self defense, but they are miserable to shoot for fun.
9mm 1911 - Again, I know this isn't an original idea, but all of the ones on the current market are quite expensive and I don't feel like they have the quality behind them that justifies their prices.
Anyway, the gunshow was a bit of a waste of time. A lot of paranoids spouting off political agendas and people of questionable sanity (and hygiene) cheering them on. I hate to say it, but these are the people that give gun owners a bad image. No wonder I've been way more involved in the guitar lately.
Wednesday, June 13, 2012
Futurlec could learn a few lessons from Mouser
What separates a company that is good to do business with from one that is unpleasant isn't how they treat the customer when everything goes right but how they handle mistakes and keeping the customer happy.
I don't think I am a difficult customer. I have dealt with many companies for various reasons and in the end, the outcome was almost always one that kept me as a satisfied customer. In some cases the companies went above and beyond and now when I discuss companies such as Morley or Antique Electronic Supply, I always tell of their amazing customer service! Other companies (like EMG) have left me soured and I will never do business with them again.
I had ordered electronic components for my up and coming business from Futurlec. In the past I had never had any issues. It took some time for the items to arrive but the prices were good enough to justify the wait. My most recent and final order was placed at the beginning of April 2012. I waited roughly 45 days before contacting them asking if my order had shipped and why it had not.
I was told it had not shipped as 3 items were back ordered and they were having difficulty securing those items. I told them to cancel those items and to ship the remainder of the order.
I get another response from them saying that due to the weight of my package, they would need to charge my card an additional fee on top of the shipping fee I had already paid. I told them to cancel the entire order.
Their shipping is set up where you pay a shipping price based on how much you spend rather than how much the item weighs. That is their system. Not mine.
I waited a few days and checked my bank. They had issued me a credit...but it came up $15.82 short from what I had originally been charged. This of course doesn't include the $7.05 exchange rate charge that my bank hit me with because they didn't ring in my order in US currency.
I asked them to refund the remainder of the money I was owed. They said they had issued me a full refund but would leave $15.82 on my account as a credit anyway.
I will NEVER order from them again so what good does a 15$ credit do me!?
I have since contacted my bank to have the money recovered through their fraud protection/merchant dispute. While this has been an inconvenience for me and the amount of money isn't the issue, it is the principle that is important.
Do your customers right and they will continue to patronize your service.
Following the cancellation of my order with Futurlec, I spent a few hours on Mouser's website trying to recreate a similar order. I got the important things ordered and paid for the most basic shipping on the Friday Night of Memorial Day Weekend.
I get a confirmation email saying that my order was received. Then I got another email on Saturday saying my order shipping had been upgraded from UPS ground to UPS 2 Day Air.
Following that, I had another email saying my shipping had once again been upgraded for free from UPS 2 Day Air to UPS Overnight Air.
I had my parts on Thursday. I was more than pleasantly surprised by this. I have made orders with Mouser before but this was going above and beyond. One of the emails said something to the effect of me being a valued customer and how they understood that having my components was important. It made me feel important and from now on, I will order from Mouser and not screw around with cut rate companies with cut rate customer service.
Fixing a Fender Frontman 15B
I was given a Fender Frontman 15B amplifier to repair.
For as long as I've been fixing equipment, I've been fascinated by how people describe problems and what they assume the fix to be. I'm sure we've all seen the ads on many popular sites about how they are selling an amplifier that just needs one "easy" fix. And somehow, despite this fix being so easy, it is never done. I've gone off on a bit of a tangent.
The amplifier was given to me with the problem description being that the input jack is bad and you need to wiggle the cord to get it to make sound. Truly an easy repair!
I disassembled the amplifier which is the bass variant of the Frontman amps (hence the B designation). It comes apart pretty easily. There are 6 screws on the back which remove the back panel. The back panel also has the power jack on it. I removed the terminal connections from the power jack. There are 2 screws inside on the under side of the chassis which hold it in place as well as the 2 screws which hold the handle. I disconnected the terminals from the speaker and carefully slid the chassis out of the box.
The board is mounted in such a way where you can see the trace side of the PCB. It was clear that the input jack was free to move. Additionally, I spotted a broken solder joint on the volume pot. Worse than the input jack being broken, the threads for the plastic nut were also stripped and I do not have any spare Fender style jacks. I did have some Marshall style jacks though from when I was working on a friend's plexi RI.
I decided that it would be a good replacement jack. I soldered it in and fixed the bad solder joint on the volume pot and reassembled ready to pat myself on the back for a job well done.
Only problem is, the amp was motorboating now. Admittedly, that was a step forward for this amp which had previously been dead quiet, but not the end result I had been shooting for. I had to reassemble it and take a closer look.
While I had the amp disassembled I turned it on with the speaker disconnected. The output IC is a TDA2050 (just like I put in my Marshall VS15R!) so I know it can handle no load. However R22 (a 5.6 ohm resistor) could not handle the load and promptly began to smoke. I turned off the amp and decided to just kind of replace everything quickly.
R22 was replaced with 2 10 ohm resistors in parallel giving me 5 ohms which is close enough. I probably could have picked different values to get closer to the original 5.6 ohm load, but the value hardly seemed critical.
I also replaced U1 and U2 which are the input IC and post gain/eq buffer/driver IC (respectively). U3 is the output ic. U4 and U5 drive some sort of compression circuit.
I reassembled and crossed my fingers. Powered the amp on and was now ready to pat myself on the back! Success!
I'd like to take a moment to talk about some of the pros and cons of working on this amp.
Pros:
-Fender provides the schematic for this amp free of charge on their website! All companies should do this and most used to. Now schematics are like secrets from most companies.
-The circuit was fairly straight forward with the only complicated part going to the compression circuit.
-It came apart extremely easily.
Cons:
-The board had traces which were very easy to damage. I managed to break the LED trace off of the board entirely just by touching the LED in the wrong way.
-The schematic provided was close but had a couple of glaring and major differences from the actual unit. Most striking was the speaker output on the schematic instead of a CD player input.
-While the amplifier came apart easily, I had to do it multiple times as the tolex managed to get in the way a couple of times during reassembly and I don't like sloppy tolex.
-And finally, I didn't get paid for this amp at all because it was a favor.
Because I was not getting paid for my work, I did make a few parts substitutions with what I had on hand. For example, the 5.6 ohm resistor that burnt up was replaced with 2 10 ohm resistors in parallel for 5 ohms. U1 and U2 were TL072 op amps which I replaced with MC4558 op amps. They will sound close enough but they are not the same. I just didn't have any TL072 op amps around. And the input jack was replaced with a marshall style jack (which is a much nicer jack anyway!).
I know a lot of people might not waste their time repairing an amp like this when the used value is probably worth less than the time I put into it, but I have the time and the grand total in parts was well under 5$ to repair the amp.
Another thing I'd like to note about the amp is how much additional circuitry Fender put into the amp than is absolutely necessary for a bare bones amplifier. U4 and U5 could be eliminated entirely and the amplifier would probably sound pretty close at lower volumes and would distort at higher volumes a bit more. But for a practice amp, I am actually impressed with how much engineering they put into it.
Thursday, May 24, 2012
The Marshall amplifier that stopped a crime ring!
Before I really knew much about amplifiers or even guitars, I was highly suggestible to the imagery that is presented in all of the common guitar literature. The kind of material that costs thousands of dollars in ad campaigns.
I wanted to sound my best like any guitarist naturally would want. I believed the weak link in my sound at the time was my amplifier (instead of my playing which still could use some help). I had been playing through a Dean Markley amplifier and while it got the job done and had served me for years, I was searching for something of an icon!
Around that time, the second series Marshall Valvestate amplifiers were being released. They bear almost no resemblance in sound or design to their namesake. The older Plexi style and non master volume JMP Marshalls are based around a modified Fender Bassman circuit while the master volume JMP and early JCM800 amps are based on a modified Plexi/JMP style amp.
Now having a lot more experience, I find it difficult to get anything I like out of a non master volume Marshall. The controls are somewhat unresponsive and the amp piercingly bright or exceptionally dull depending on the channel and tube set. I've heard others use these amplifiers in ways that I only dreamed of, but much like the Big Muff, I decided that it is best to leave these non master Marshalls in the hands of serious players who demonstrate that tone is in the fingers and not the amp.
After the single channel JCM800 amplifier, I pretty much lose all interest in Marshall amps. The circuitry becomes way too convoluted.
Anyway, the Valvestate amplifiers share zero ancestry with these notorious Marshall amps. In fact the only real connection is that the amplifier says Marshall on it and has similar cosmetics. But I didn't know any better.
I bought the smallest model in the line. The VS15R. There was also a non reverb variant made. The VS15 and VS15R have the distinction of being the only valvestate models NOT to feature a tube of any sort. All of the other models had a 12ax7 in the preamp somewhere. I don't remember those amps sounding particularly good, but hybrid amps were a big deal at the time. Some companies like Music Man had tried solid state preamps with tube driver and output stages. Nearly every other company tried a tube preamp with a solid state output.
The VS15R featured a nominal 15 watt output into an 8" speaker and had a simple set of controls. It actually sounds pretty good for a cheap practice amp. I've heard cheap tube amps which sound much worse as well as more expensive solid state which sounds far worse.
The amplifier is actually pretty simple inside. It features a set of 4558 chips for the preamp, a 1458 on the reverb, and a TDA2030A on the output.
After becoming a bit wiser to amps, my Marshall began to see less and less use as I had gotten into vintage Blackface Fender, Ampeg, and Gibson amps from the 50's and 60's. I eventually gave the amplifier (box, warranty card, and manual!) to my brother who was learning to play guitar.
He tinkered with it and enjoyed it....Until...
His house was burglarized. His guitars and amplifier were amongst the stolen items. This sort of burglary had been going on in his Florida community alongside of neighboring communities. The thieves would break in and take what they wanted and pawn it through a series of friends and acquaintances. They had gotten away with it for some time as nobody ever had serial numbers for stolen items to pin them to the crime.
That is until they stole the Marshall VS15R without taking the box which has the serial number marked on it.
The amplifier turned up in a local pawn shop. Florida has some very unfair rules regarding victims having to buy back their equipment, but I suppose it is in return for their full cooperation. My brother was forced to buy back this amplifier for the original pawned price.
I'm sure he slept a little easier on that injustice knowing that the person who pawned it was sitting in a police station for questioning. Turns out it was a woman who pawned it for her boyfriend who happened to be the one who stole the amplifier. The police were able to take finger prints off of the amplifier and match it to the suspect. The amplifier had finger print dust on it for years almost as a trophy that my brother would show off.
Fast forward a few years, my brother was playing through the amplifier. Took a break. Came back to play some more and the amp no longer worked. It made an awful steady tone which was not sensitive to the volume or tone controls.
I recall in my younger curiosity opening the amplifier. All of the parts laid out looked like Greek to me. Not this time. I had scored some time at the bench while working for Ibanez. I have always been naturally pretty good at troubleshooting things and this was no different than any other amplifier I had worked on...except I didn't have a schematic nor could I find one online.
I probed around and took some voltage readings. I noticed the power rail for the output IC was 21.2 Volts which is just .8 volts shy of the absolute maximum for the TDA2030A chip. I took some readings on the chip and got all kinds of screwball numbers. I removed the chip and researched it a bit.
I learned that the TDA2030 is a popular choice for small amplifiers because it requires very little support circuitry. Countless examples were shown. One thing they all had in common was how sensitive the chip was to exceeding the voltage rating.
I figure a power surge probably did the amp in. And being that this amp was a hero (even though many will never know it!), it was not fitting that it end up in a landfill!
I replaced the TDA2030A with a TDA2050 which has a slightly higher voltage rating and a higher wattage rating but left the rest of the circuitry alone.
Reassembled. Crossed my fingers and turned the amplifier on for the first time in years.
Fired right up! The hero has been resurrected!
And that is the story of how a Marshall amplifier stopped a crime ring...with a lot of tangents and technical information thrown in.
Saturday, April 28, 2012
Gibson Les Paul Special Premium Plus and my New Plan
Since writing last a lot has changed on my end.
I've acquired software to create PCBs, a tank for etching them, miscellaneous tools, and a load of parts are on order for a run of effect units.
I am also hoping to sell some miscellaneous guitar accessories.
Meanwhile I am looking to incorporate and have a website made. I have already purchased a domain and hosting.
I realize how incredibly vague that is, but I don't want to let anything out yet until it is finalized.
I've also censored out a lot of my previous post so if things seem out of context or don't make a whole lot of sense, that is probably why.
Now onto the new guitar!
I purchased a 2008 Les Paul Studio Premium Plus at a local store. It had occurred to me that I didn't own a guitar with humbuckers and that might make testing effects a bit one sided. This is especially true since humbuckers are probably more popular than single coil pickups anymore.
Admittedly I could have bought any number of other guitars that would have satisfied my criteria, but I also wanted something that spoke to me a bit.
I originally started my quest looking for a Les Paul style guitar with a maple cap, humbuckers (no p90's or mini buckers), and a real finish (not a faded or tribute model). The new batch of Studios looked like a good place to start. I wanted to try out the silverburst studio I had seen a few weeks back but by the time I was ready to buy, it had been sold. In the end, I had visited 3 stores and played 3 or 4 different Les Paul Studios.
I found the Les Paul Premium Plus at the last store used but not beat on. Mine has a few small dings in the top and a lot of belt buckle rash on the back but no heavy fret wear and nothing I can't live with.
All of the studios I played sounded pretty good which surprised me. I recall a friend having a studio more than a decade ago and it completely underwhelmed me. That image of the studio stuck with me for a long time and I simply avoided them altogether.
In retrospect, perhaps a good setup was in order as all of my reading indicated that the studios are very close to standards for most years with only a few minor cosmetic differences. Some of those differences are preferences of mine anyway. I was never big on binding.
The newest studios have different pickups than some of the older studios as well as "coil tapped" humbuckers which are activated by push pull volume controls. To my ears, the newer studios are very bright without sounding harsh. This is true even in the neck position. The coil tap sounded good and added an additional sound to an already good sounding guitar.
The newer studios also have speed style knobs while the Premium Plus has bell knobs. Speed knobs are certainly more functional but bell knobs just look great!
The older studios (which includes my Premium Plus) have a 490R neck pickup and a 498T bridge pickup. I thought they were darker all around than the newer studios but that the high end could become a little more harsh if you allowed it. The sound overall embodied what I expected a Les Paul to sound like more so than the newer studio models. Both sounds are good but different enough that it becomes rather easy to tell them apart and to have a preference. In a perfect world, I'd have a newer studio to go with my Premium Plus.
The hardware on the Premium Plus is gold and has covers on the humbuckers which makes me quite happy. I also like that from time and use, the gold color has worn away on the bridge and tailpiece a bit. I think it adds character but I guess it is a warning for those who want the guitar to remain gold forever. I have seen other complaints online about the gold color fading so this is not an unusual occurrence.
Another thing that separates the Premium Plus from other Les Paul Studios is the AAA flame maple. From what I understand, they still offer this option and some come with dyed tops, but mine is the natural top as seen in the pictures below. The top wood is definitely very attractive and even other top end Les Paul Standards don't have AAA grade maple.


One complaint I do have about ALL of the Les Pauls and actually all Gibsons I have played lately (including 3000$+ models is that the paint on the top by the neck always looks terrible. Sometimes it has a nasty texture to it and other times it is missing small patches. I don't know if the problem is in the color coat or the clear coat or maybe both coats, but it detracts from the quality of the finish and in my opinion should never have left the factory looking like that. I think it looks bad on a 500$ guitar...It is inexcusable on a 1500$ guitar.
My last Gibson I owned was a 1998 Les Paul Special with P90's. It was a nice guitar and I picked up a cheap used case. I recall the lock being broken on it. I also recall the lock breaking on my friend's LP special case from the 90's. I was pleasantly surprised that the new cases no longer have that lock on them. What they have done now is put a small hasp on the case so you can use a lock of your own. Personally, I'd go with an Abloy PL-321. I didn't check the size of the hasp, but I'd imagine it should fit and the only way that lock is coming off is with the key or a bolt cutter.
Supposedly the neck shape on the Premium Plus is a 59 shaped neck. I played a bunch of different Gibson necks and from what I read, they are CNC machined into rough shapes and then hand finished creating a unique neck for each instrument. In all, most of the necks felt similar enough to be called a Gibson and none were particularly uncomfortable.
The Premium Plus also supposedly has weight relief routes in the body. It is still heavy when compared to a Swamp Ash Telecaster but weighs just a little less than a normal Les Paul Standard. I can't say it has made the guitar any more resonant but it does keep my back just a little happier.
Another interesting quirk I discovered about this guitar was that Gibson started using circuit boards in the control cavity! When did this start happening? I can see how this would speed up wiring, but I don't like that they used ceramic capacitors nor do I like that replacing a single pot involves removing all of the pots to either service the board or replace them with individual pots. I had been planning on adding the coil tap function that I enjoyed so much on the newer Les Pauls but for now that is going to wait as I don't feel like toying with all of those connectors. I am wondering what is behind curtain number 2 (the switch control cavity) but I haven't been brave enough to look yet.

To complete the review, the Les Paul Studio Premium Plus is a guitar loaded with expensive features on an inexpensive (well compared to a Les Paul Standard anyway) guitar. While I am not totally happy about the circuit board controls or the finish around the neck, these are things I can live with or fix on my own if I am willing to spend the time.
Wednesday, March 7, 2012
Sometimes nothing goes right
There isn't much you can do sometimes except roll with the punches.
I've been sick which makes every little snag seem amplified. All I really want to do is sleep and get better but I have obligations I need to meet. Nothing becomes more frustrating than forcing yourself to work on a project only to run into problem after problem.
Screws. When did screws get so cheap that the heads strip with a properly fitted bit and minimum torquing?
Hardware finishes. What is the point if they have no protective quality?
This all kind of makes me think of a quote Nikola Tesla said of Thomas Edison, "His method was inefficient in the extreme, for an immense ground had to be covered to get anything at all unless blind chance intervened and, at first, I was almost a sorry witness of his doings, knowing that just a little theory and calculation would have saved him 90 percent of the labor."
Lately with nothing going right, I have been thinking of exiting the guitar making business. I can't say that it has brought me any closer to financial bliss. This has never been about the money though. I wanted to do something I enjoy.
However, I am not even close to breaking even on this venture. The cost of tooling up and maintaining equipment has far outweighed any sort of commission I have made.
Additionally, I don't appreciate all of the problems falling into my lap. And worse than having to deal with problems, other than my own, is being treated like I am incompetent. Absolutely no benefit of the doubt has been made.
No confidence in my work. No communication until some arbitrary deadline has been missed.
None of this matters though. It is ultimately all my fault.
I am no longer enjoying this.
Well consider this the straw that broke the camel's back. I am done rolling with the punches. I am done accepting blame for things that are just out of my control.
I guess I have some thinking to do.
Wednesday, February 29, 2012
Leap year update...
I have been trying to update once a month and I figured the 29th of February was a special enough occasion to wait for.
I took a friend shooting for the first time last month. We shot a variety of guns including my Walther P38 mentioned in another post. My first impression of the Walther was that it was a very smooth shooting gun. I didn't expect that. I thought it was really going to be nasty. Especially when you see how wimpy the dual recoil springs look when compared to modern firearms.
I also shot my Colt 1991A1 after performing the trigger pull modifications. I was quite pleased with myself! No issues or misfires. I suppose now I can pat myself on the back for a job well done!
Additionally, we shot my Smith and Wesson 686-5 with a 4" barrel. However, when I took it home for cleaning, I was dismayed to see that the firing pin bushing was missing a chunk! I was shooting factory load American Eagle 38 special 130 grain FMJ. I contacted Smith and Wesson and they sent me an RMA. 2 weeks later my gun was back in my hands repaired at no cost! Smith and Wesson has top notch customer service and I want to acknowledge and thank them for that!
If you enlarge the pictures, you can see the firing pin bushing is missing a chunk.


I've been unfortunately too busy lately to get back to the range to test fire the 686 since it has been returned.
I also picked up a CZ75B in some sort of limited stainless finish.
 I was looking for a new 9mm pistol (as though I needed one) and had read about how unique the design was. The slide sits in the frame instead of on it. It is a neat gun and a lot of fun to shoot. I liked the regular CZ75B well enough except the sights were kind of junky looking. The photo luminescent dots weren't round so much as blobs put on by some sort of paint brush. Instead I got the nicer model with true night sights.
It was fun to shoot although I think I need to get a feel for it still as I was shooting a bit lower with it than I expected.
From what I can tell, the CZ75B is an all around good deal though if you are looking for a reliable all steel gun in 9mm. Most metal framed 9mm pistols on the market are aluminum alloy.
I have been making a conscious effort to try and play guitar and work on guitars daily and denying myself any sort of reward until I have. This system has definitely been helping. Hopefully this will lead to a resurrection of my SpaceCharge effects and amplification project which has been on hiatus for a very long time now.
Despite the short writing on guitars, I have been in a much more musical space than in a gun space lately.
I took a friend shooting for the first time last month. We shot a variety of guns including my Walther P38 mentioned in another post. My first impression of the Walther was that it was a very smooth shooting gun. I didn't expect that. I thought it was really going to be nasty. Especially when you see how wimpy the dual recoil springs look when compared to modern firearms.
I also shot my Colt 1991A1 after performing the trigger pull modifications. I was quite pleased with myself! No issues or misfires. I suppose now I can pat myself on the back for a job well done!
Additionally, we shot my Smith and Wesson 686-5 with a 4" barrel. However, when I took it home for cleaning, I was dismayed to see that the firing pin bushing was missing a chunk! I was shooting factory load American Eagle 38 special 130 grain FMJ. I contacted Smith and Wesson and they sent me an RMA. 2 weeks later my gun was back in my hands repaired at no cost! Smith and Wesson has top notch customer service and I want to acknowledge and thank them for that!
If you enlarge the pictures, you can see the firing pin bushing is missing a chunk.

I've been unfortunately too busy lately to get back to the range to test fire the 686 since it has been returned.
I also picked up a CZ75B in some sort of limited stainless finish.
It was fun to shoot although I think I need to get a feel for it still as I was shooting a bit lower with it than I expected.
From what I can tell, the CZ75B is an all around good deal though if you are looking for a reliable all steel gun in 9mm. Most metal framed 9mm pistols on the market are aluminum alloy.
I have been making a conscious effort to try and play guitar and work on guitars daily and denying myself any sort of reward until I have. This system has definitely been helping. Hopefully this will lead to a resurrection of my SpaceCharge effects and amplification project which has been on hiatus for a very long time now.
Despite the short writing on guitars, I have been in a much more musical space than in a gun space lately.
Friday, January 6, 2012
Colt 1991A1 Upgrades and Trigger Job
The Colt 1991A1 is at its core a series 80 1911 with a parkerized finish. What separates the series 80 from the series 70 is a firing pin block added to the series 80 models to (hopefully) prevent an accidental discharge should the gun be dropped or the hammer fall without the trigger being pulled.
When I originally purchased my Colt, I was new and very naive to 1911. I had fired a few here and there but didn't really understand what made one different than the others.
I quickly realized that it is the little details that separate one from the next. The gun came with staked mil spec style sights. They were difficult to use. I had my local range mill new sights on the gun. Now it is much more user friendly on the visual end.
However, the trigger was kind of stiff and heavy. Additionally, I didn't care much for the kick. Compared to other 1911s I had fired, it kicked quite a bit. I asked around on one of the gun forums I frequent (I am up to 3 now I believe) about what could be done to remedy these issues.
I was given some really good advice and I followed it as best I could.
I had asked about changing out the recoil spring for a heavier recoil spring in an effort to reduce the recoil. I was informed that this would actually increase the perceived recoil and also open the gun up to cylcling issues as well as possibly limp wristing issues. Additionally, full size guide rods were deemed to be only beneficial if they were substantial in weight and even then it was arguable as to how much good they did.
I decided to avoid this dillemma by replacing the recoil spring with a stock Colt 16 lb spring. This way I know I am using what was intended.
I was also advised that I could replace the mainspring with a 19 lb spring for a reduced trigger pull. While a heavier mainspring will slow the slide down a bit and reduce felt recoil, I opted for this as the trigger pull was pretty high. I unfortunately did not measure it before I began my work.
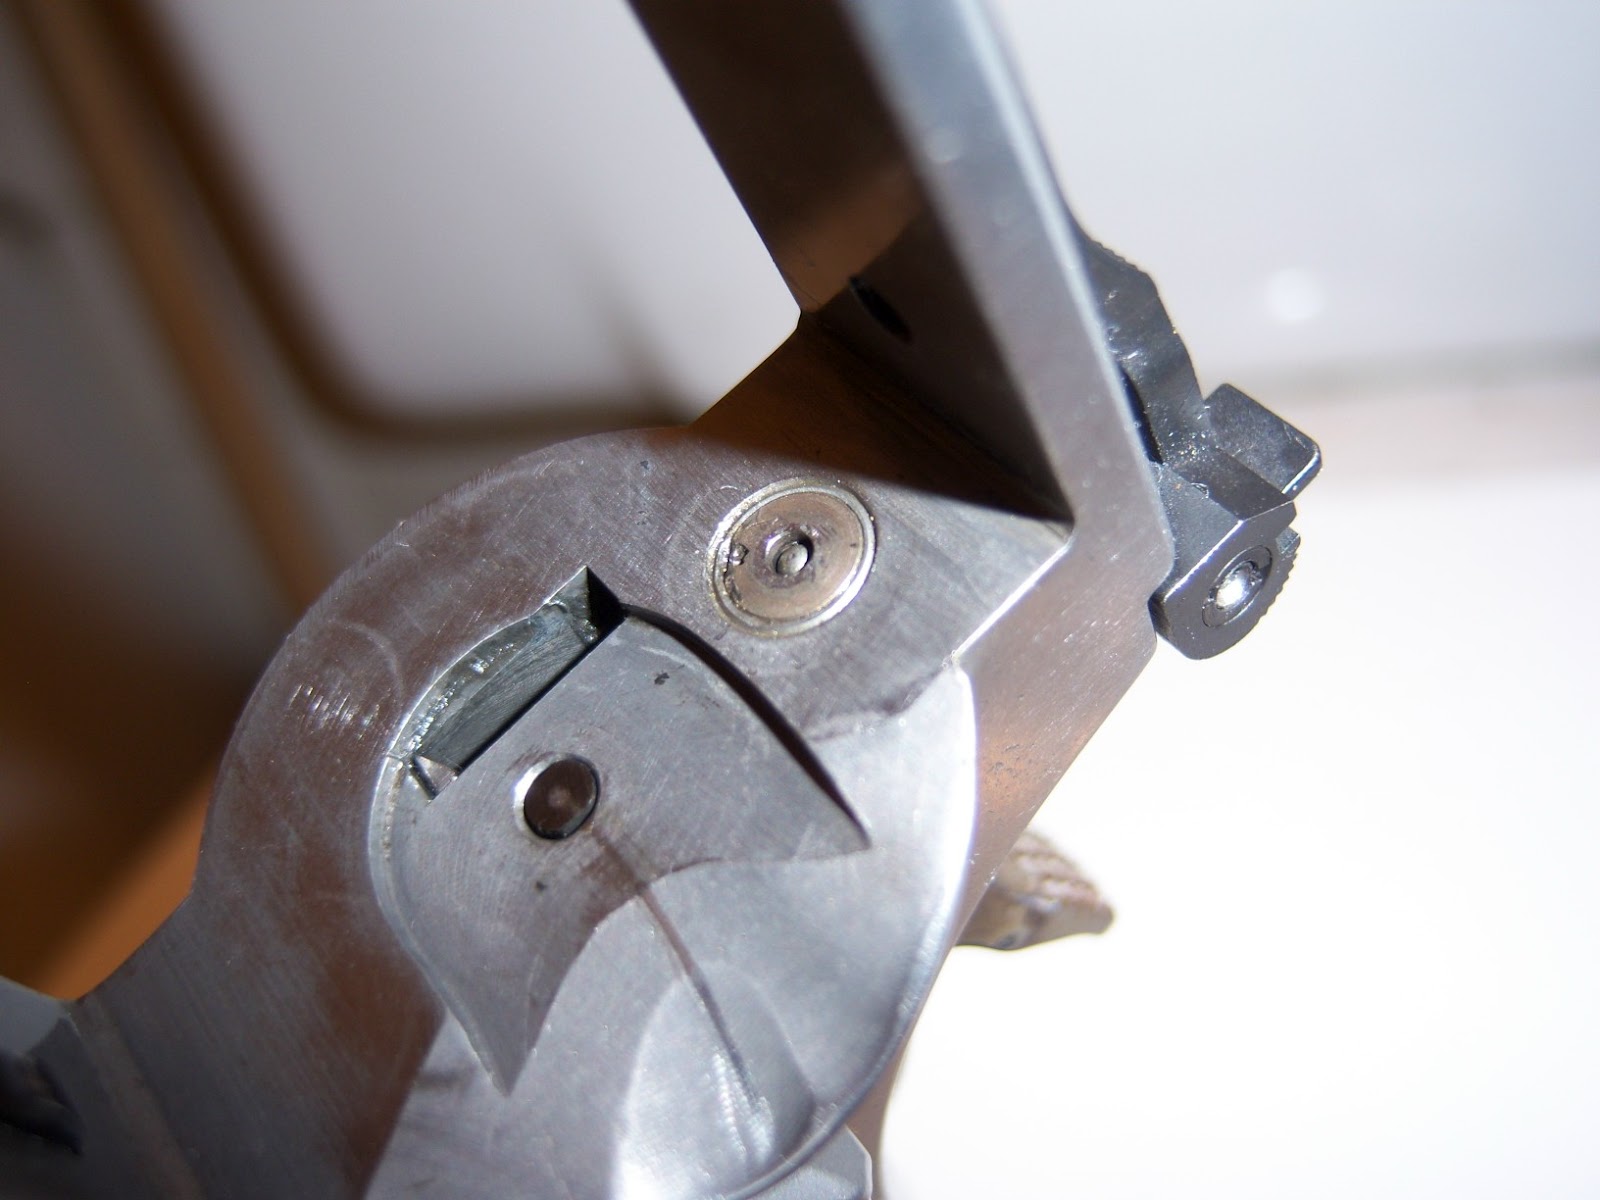
The subject of firing pin stops also came up. The firing pin stop is not to be confused with the firing pin block. The stop is the part that holds the firing pin in the back of the slide. The original Browning design called for a squared firing pin block but for some reason or another, a bevelled firing pin block eventually found its way onto the gun and most guns to date have this bevelled style. This changes where the slide contacts the hammer. A higher point on the hammer axis/pivot gives more leverage and makes the job easier. The squared firing pin stop lowers this contact point and reduces the slide velocity by making the slide work harder to reset the trigger.
I purchased an EGW oversized firing pin stop and carefully fitted it and put an ever so slight break in the sharp 90 degree angle of the firing pin stop to prevent it from destroying the hammer. I was actually surprised at how easy the slide was to rack despite this upgrade. This part required a lot of fitting. In the end, I took my time and used a medium stone and was very pleased with how it came out although I did end up removing a lot of the finish from it while fitting it.
While I had the firing pin stop off of the gun, I also took the firing pin, the firing pin block, and extractor out of the gun and replaced the firing pin block with one coated in titanium nitride from Cylinder & Slide as part of their series 80 trigger pull reduction kit. This kit included 5 parts all coated in titanium nitride. Those are the gold parts you see on the gun. I was not trying to be fashionable. Although I do think it looks good on the gun.
I replaced the hammer pin and the sear pin as well as they were a part of the kit. The other two parts replaced from the kit were the two levers which disengage the firing pin block and allow the firing pin to move forward. This was a very easy kit to install and everything was drop in.
I also took it upon myself to replace the trigger which was a plastic trigger with a Cylinder & Slide "Videki" trigger. The videki trigger is a long style trigger with a serrated front and 3 holes. It is made out of aluminum and required fitting. Again I used a medium stone and took my time stoning each side of the trigger shoe until it slid into the frame. There is now no vertical play like there was with the factory trigger.
When holding the pistol, I always noticed that the sights naturally sat to the side instead of dead on like my Beretta 92FS does. It was then that I realized how important an arched mainspring housing was. Some people like them and some don't. I am a part of the definitely like them group.
The mainspring housing was replaced with an arched model. I went cheap on this and bought a no name part from CDNN and another no name part from Midway USA. One had a serrated back and the other checkered. Both were made out of steel and both required more fitting than I expected or would have liked. The problem was that the hole that holds the mainspring housing into the frame at the bottom wasn't quite lining up with my gun. I am going to blame the parts and not the gun. I drilled the holes ever so slightly larger and managed to get the checkered mainspring housing in. I like how it looks and feels. It also brings the sights right up to my eyes just like my Beretta 92FS does! I wish I would have known all of this prior to buying!
Lastly I replaced the grips with a cheap set from CDNN. I like how they look and feel but I do not like how they fit the gun. They do not fit the bushings that came on it very well and required some fitting. I don't like fitting grips. I don't know why, but I'd rather fit metal parts all day instead of grips. I got them onto the gun, but I may end up replacing them later with real Colt brand grips just to avoid any issues in the future. I will determine that later though after I have shot the gun some.
I didn't actually mind the original rubber grips either. They were black and looked kind of cool. But I am a big fan of wood so I figured why not? When I removed the rubber grips, they were stuck to the frame from what appeared to be dried solvent/lube. It was quite sticky.
All of the previous was primarily cosmetic or ergonomic. The trigger job was what really set the gun apart from its former self. I suppose trigger job is a bit of a misnomer. I didn't sand or polish any internals on the gun. There were no burrs to begin with and I felt that without a jig of some nature, I was bound to do more harm than good toying with stones and hardened parts.
The only part I adjusted was the sear spring. The sear spring is a cool part. It is just a leaf spring with 3 leafs on it. One controls the grip safety, another for the disconnector/trigger reset, and the last for the sear.
Looking at the back of the gun with the grip safety removed and the hammer strut out of the way, the grip safety leaf is the one on the right.
The one in the middle is the disconnector and trigger reset.
The one on the left is the sear leaf.

With a trigger pull gauge, I slowly bent the middle leaf until I obtained just a little over 16 oz (1 lb) on the trigger pull before the sear leaf was engaged. This was surprisingly harder than it seems. The spring is thick and quite difficult to bend. I tried to maintain the same natural curve as best I could and just reduce the tension on the trigger and disconnector. This took a few attempts and finally I got it.
Then I did the same thing on the sear leaf. This time I was shooting for a combined total of 32 oz (2 lb) from both the disconnector/trigger leaf and the sear leaf being engaged at the same time. I came up a little high and decided to leave it at that. Going too low can cause a lot of safety issues so I errored on the side of safe.
While bending the sear leaf, I did change its angle a little as the mainspring housing interfered with where I was bending and basically negated any adjustment I was making. That is a good design for a safe stock gun, but not so good for tweakers like myself. In the end, I bent just above the mainspring housing on the sear leaf. Again, it took a few tries to get it right.
I reassembled the entire pistol and checked my trigger pull. 3 lb 10 oz.
I am very pleased. The trigger is quite nice. I'm sure it could be nicer if I had polished all of the internals and set up the overtravel screw, but I am just taking baby steps.
One thing that is important to note is that I also did a preliminary safety check on the gun. I made sure the grip safety as well as the manual safety still worked. I also rack the slide on an empty chamber a few times and checked to make sure the hammer didn't follow the slide or that the trigger didn't bound causing the hammer to fall. I also dropped the slide with the slide release the same way.
I haven't taken it to the range yet, but when I do, I will start with 1 round in the magazine and fire. Then if all is well, I will put 2 in the magazine and continue slowly working more rounds in until I am certain that the gun is safe.
Another important thing I should mention is that I will never ever carry this gun. I have no doubt about its internal safety, but having a reduce trigger isn't necessarily a good thing for a carry/defense weapon. And I am not just talking about legal liabilities should somebody get wind of a modified weapon being used in a defense shoot. You don't need a hair trigger on a gun like that.
Honestly, if the trigger were much less than it is now, I don't even think I would like it. Right now it is at the bottom of what I'd consider to be comfortable.


When I originally purchased my Colt, I was new and very naive to 1911. I had fired a few here and there but didn't really understand what made one different than the others.
I quickly realized that it is the little details that separate one from the next. The gun came with staked mil spec style sights. They were difficult to use. I had my local range mill new sights on the gun. Now it is much more user friendly on the visual end.
However, the trigger was kind of stiff and heavy. Additionally, I didn't care much for the kick. Compared to other 1911s I had fired, it kicked quite a bit. I asked around on one of the gun forums I frequent (I am up to 3 now I believe) about what could be done to remedy these issues.
I was given some really good advice and I followed it as best I could.
I had asked about changing out the recoil spring for a heavier recoil spring in an effort to reduce the recoil. I was informed that this would actually increase the perceived recoil and also open the gun up to cylcling issues as well as possibly limp wristing issues. Additionally, full size guide rods were deemed to be only beneficial if they were substantial in weight and even then it was arguable as to how much good they did.
I decided to avoid this dillemma by replacing the recoil spring with a stock Colt 16 lb spring. This way I know I am using what was intended.
I was also advised that I could replace the mainspring with a 19 lb spring for a reduced trigger pull. While a heavier mainspring will slow the slide down a bit and reduce felt recoil, I opted for this as the trigger pull was pretty high. I unfortunately did not measure it before I began my work.
The subject of firing pin stops also came up. The firing pin stop is not to be confused with the firing pin block. The stop is the part that holds the firing pin in the back of the slide. The original Browning design called for a squared firing pin block but for some reason or another, a bevelled firing pin block eventually found its way onto the gun and most guns to date have this bevelled style. This changes where the slide contacts the hammer. A higher point on the hammer axis/pivot gives more leverage and makes the job easier. The squared firing pin stop lowers this contact point and reduces the slide velocity by making the slide work harder to reset the trigger.
I purchased an EGW oversized firing pin stop and carefully fitted it and put an ever so slight break in the sharp 90 degree angle of the firing pin stop to prevent it from destroying the hammer. I was actually surprised at how easy the slide was to rack despite this upgrade. This part required a lot of fitting. In the end, I took my time and used a medium stone and was very pleased with how it came out although I did end up removing a lot of the finish from it while fitting it.
While I had the firing pin stop off of the gun, I also took the firing pin, the firing pin block, and extractor out of the gun and replaced the firing pin block with one coated in titanium nitride from Cylinder & Slide as part of their series 80 trigger pull reduction kit. This kit included 5 parts all coated in titanium nitride. Those are the gold parts you see on the gun. I was not trying to be fashionable. Although I do think it looks good on the gun.
I replaced the hammer pin and the sear pin as well as they were a part of the kit. The other two parts replaced from the kit were the two levers which disengage the firing pin block and allow the firing pin to move forward. This was a very easy kit to install and everything was drop in.
I also took it upon myself to replace the trigger which was a plastic trigger with a Cylinder & Slide "Videki" trigger. The videki trigger is a long style trigger with a serrated front and 3 holes. It is made out of aluminum and required fitting. Again I used a medium stone and took my time stoning each side of the trigger shoe until it slid into the frame. There is now no vertical play like there was with the factory trigger.
When holding the pistol, I always noticed that the sights naturally sat to the side instead of dead on like my Beretta 92FS does. It was then that I realized how important an arched mainspring housing was. Some people like them and some don't. I am a part of the definitely like them group.
The mainspring housing was replaced with an arched model. I went cheap on this and bought a no name part from CDNN and another no name part from Midway USA. One had a serrated back and the other checkered. Both were made out of steel and both required more fitting than I expected or would have liked. The problem was that the hole that holds the mainspring housing into the frame at the bottom wasn't quite lining up with my gun. I am going to blame the parts and not the gun. I drilled the holes ever so slightly larger and managed to get the checkered mainspring housing in. I like how it looks and feels. It also brings the sights right up to my eyes just like my Beretta 92FS does! I wish I would have known all of this prior to buying!
Lastly I replaced the grips with a cheap set from CDNN. I like how they look and feel but I do not like how they fit the gun. They do not fit the bushings that came on it very well and required some fitting. I don't like fitting grips. I don't know why, but I'd rather fit metal parts all day instead of grips. I got them onto the gun, but I may end up replacing them later with real Colt brand grips just to avoid any issues in the future. I will determine that later though after I have shot the gun some.
I didn't actually mind the original rubber grips either. They were black and looked kind of cool. But I am a big fan of wood so I figured why not? When I removed the rubber grips, they were stuck to the frame from what appeared to be dried solvent/lube. It was quite sticky.
All of the previous was primarily cosmetic or ergonomic. The trigger job was what really set the gun apart from its former self. I suppose trigger job is a bit of a misnomer. I didn't sand or polish any internals on the gun. There were no burrs to begin with and I felt that without a jig of some nature, I was bound to do more harm than good toying with stones and hardened parts.
The only part I adjusted was the sear spring. The sear spring is a cool part. It is just a leaf spring with 3 leafs on it. One controls the grip safety, another for the disconnector/trigger reset, and the last for the sear.
Looking at the back of the gun with the grip safety removed and the hammer strut out of the way, the grip safety leaf is the one on the right.
The one in the middle is the disconnector and trigger reset.
The one on the left is the sear leaf.

With a trigger pull gauge, I slowly bent the middle leaf until I obtained just a little over 16 oz (1 lb) on the trigger pull before the sear leaf was engaged. This was surprisingly harder than it seems. The spring is thick and quite difficult to bend. I tried to maintain the same natural curve as best I could and just reduce the tension on the trigger and disconnector. This took a few attempts and finally I got it.
Then I did the same thing on the sear leaf. This time I was shooting for a combined total of 32 oz (2 lb) from both the disconnector/trigger leaf and the sear leaf being engaged at the same time. I came up a little high and decided to leave it at that. Going too low can cause a lot of safety issues so I errored on the side of safe.
While bending the sear leaf, I did change its angle a little as the mainspring housing interfered with where I was bending and basically negated any adjustment I was making. That is a good design for a safe stock gun, but not so good for tweakers like myself. In the end, I bent just above the mainspring housing on the sear leaf. Again, it took a few tries to get it right.
I reassembled the entire pistol and checked my trigger pull. 3 lb 10 oz.
I am very pleased. The trigger is quite nice. I'm sure it could be nicer if I had polished all of the internals and set up the overtravel screw, but I am just taking baby steps.
One thing that is important to note is that I also did a preliminary safety check on the gun. I made sure the grip safety as well as the manual safety still worked. I also rack the slide on an empty chamber a few times and checked to make sure the hammer didn't follow the slide or that the trigger didn't bound causing the hammer to fall. I also dropped the slide with the slide release the same way.
I haven't taken it to the range yet, but when I do, I will start with 1 round in the magazine and fire. Then if all is well, I will put 2 in the magazine and continue slowly working more rounds in until I am certain that the gun is safe.
Another important thing I should mention is that I will never ever carry this gun. I have no doubt about its internal safety, but having a reduce trigger isn't necessarily a good thing for a carry/defense weapon. And I am not just talking about legal liabilities should somebody get wind of a modified weapon being used in a defense shoot. You don't need a hair trigger on a gun like that.
Honestly, if the trigger were much less than it is now, I don't even think I would like it. Right now it is at the bottom of what I'd consider to be comfortable.


Subscribe to:
Posts (Atom)